How to Transfer Outlook Email from Mac to Windows?
Are you utilizing Microsoft Outlook on Mac for email management but somehow fed up with the same? Thinking about exporting Outlook email from Mac to Windows with ease, thus wondering how to transfer Outlook email from Mac to Windows compatible file type without data loss! Then no worries at all, simply go through the write-up and you will discover a method that will quickly export emails from Outlook Mac to Windows in just few seconds. But first, let us explore some reasons to transfer Outlook email from Mac to Windows.
Why to Transfer Outlook Email from Mac to Windows?
PST, a Personal Storage Table that is compatible to Outlook Windows. It is well-recognized for preserving the data items of Outlook that belongs to different categories such as emails, tasks, calendars, contacts, and more. The file however is created by default. Whereas, Outlook for Mac generates OLM file and it has the same purpose as PST. But OLM is not supported by Windows Outlook and there are several Mac users who need to move onto Outlook Windows for many official reasons. And to access Outlook for Mac emails into Windows environment, it is important to convert OLM files into Windows Outlook format.
How to Transfer Outlook Email from Mac to Windows?
There are two different methods to do the process –
- Expertise Recommended Tool
- Manual Approach
Both of them are further mentioned. Let’s explore them one-by-one.
Method 1. Expertise Recommended Tool to Transfer Outlook Email from Mac to Windows
The process is divided into different categories –
- Archiving Outlook for Mac data into OLM file
- Convert OLM to PST
- Import PST to Windows Outlook
Step 1. Archive Outlook for Mac data into OLM
- Open Outlook on Mac.
- Navigate to File menu and tap Export option.
- Now, in Export Window, select necessary preferences of data export.
- To generate OLM file, select the option Outlook for Mac Data File (.olm).
- Select whether you want to export data items of all categories or only the selected items.
- Click on the right arrow appearing at the bottom right of Outlook screen.
- After the screen appears, it will ask to delete items from Outlook after they are exported or not. As per your requirements, tap Yes or No by clicking on the radio buttons present. Then proceed further by clicking the right arrow displaying at the bottom right screen of Outlook.
- After the export process finishes, a message will appear on the screen showing “Outlook has finished exporting your data”. Click Done button to close the window.
Step 2. Convert Resultant OLM Files into Windows Outlook
After getting Outlook for Mac data in OLM file, download Macflick Mac OLM Converter Tool to convert archived files into Windows Outlook format i.e. PST. By utilizing the application, users can batch convert OLM files into PST along with 15+ more saving options such as EML, HTML, MBOX, MSG, PDF, CSV, Yahoo Mail, IMAP, Gmail, and more. Its interface is easy and intuitive. Both professional and novice users can operate the software without any trouble.
Additionally, the tool is programmed with incredible features with the help of users can perform the necessary task according to the requirements. However, a free demo version is also available which is used to experience the detailed conversion steps of the application for free.
Step-by-Step Software Working to Convert Archived OLM Files into Windows Outlook Data File Format on Mac
Step 1. Download, launch and run the application on Mac OS.
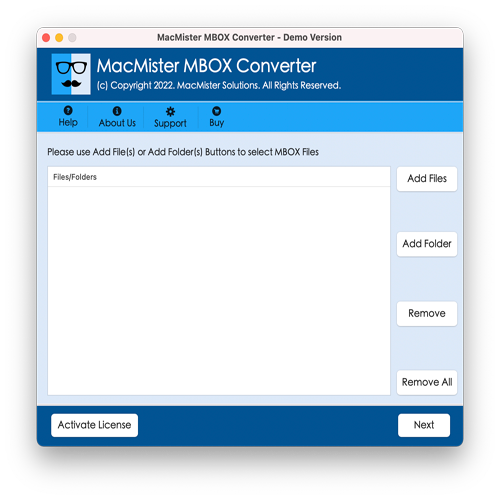
Step 3. Use the dual options present on the software screen to load OLM files. Click Add File(s) option, to add only the necessary OLM files on the tool. Or, make use of Add Folder option to load .olm files folder on the tool for conversion. Then, click Next button to proceed.

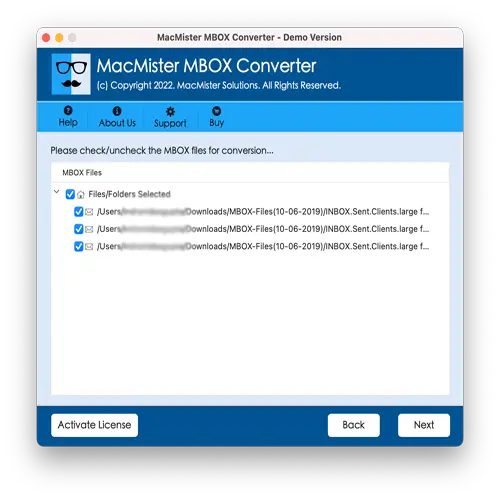
Step 4. Now, the tool shows the files on its panel with checkboxes. However, these checkboxes can be used to carry out the conversion of selected files, if needed. Then, click the Next button to continue.
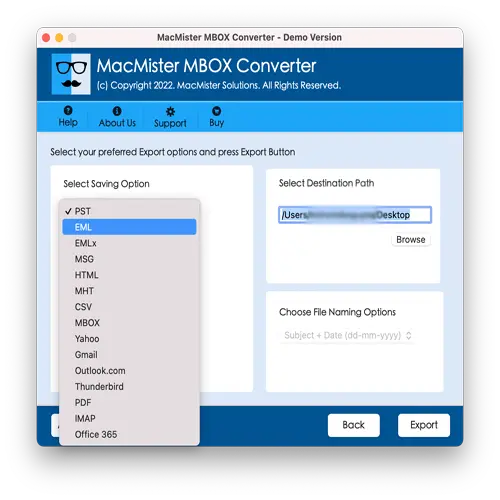
Step 5. Click Select Saving Options to select required saving type from the list appearing.
Step 6. The Live Conversion Report window will open which provide the details of live conversion of OLM files to users.
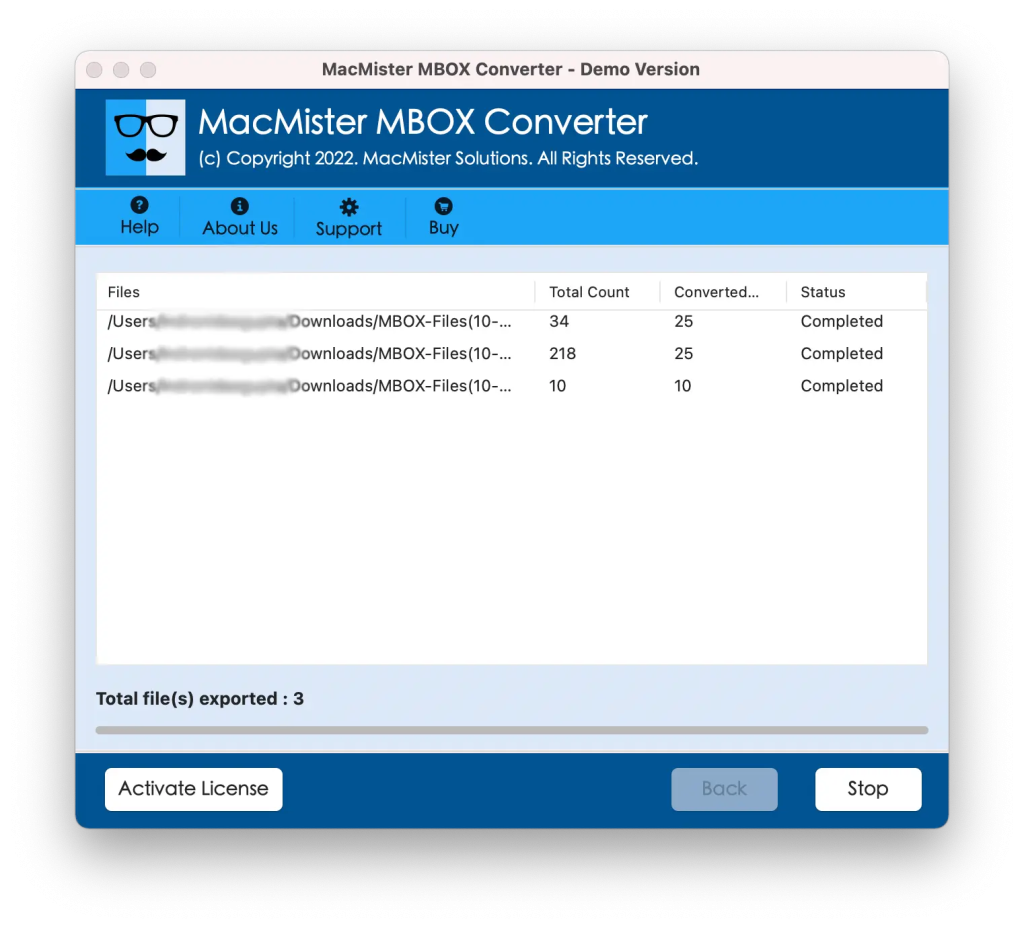
In few seconds, the tool will complete the task and then “Conversion Completed” notification appears on the screen. Click OK and then transfer converted files into Windows with the help of external drive or cloud service.
Step 3. Transfer Converted Files into Windows Outlook
Follow the below steps to transfer converted files into Windows Outlook –
- Run Windows Outlook.
- Click File, select Open & Export, and go to Import/Export.
- The Import and Export Wizard window will display, select Import from another program or file option and click Next.
- After Import a file window displays, select Outlook Data File (.pst).
- Load the path of converted PST files using the Browse button.
- Select the desired Outlook folder and tap Finish button.
Now, the entire Outlook for Mac data is easily viewable in Windows Outlook.
Method 2. Manual Approach to Export Emails from Outlook Mac to Windows
Follow the below steps to export emails from Outlook Mac to Windows manually –
- Configure Outlook Mac using one of the mentioned email accounts such as Gmail, Outlook.com, Yahoo, etc.
- After the account is configured, Copy or Move data from Outlook Mac into the email account which is connected.
- Configure Outlook Windows using the same email profile.
- Now, all the emails of Outlook Mac are visible in Windows Outlook.
The process is free to use and also implementable. But it requires technical knowledge of Outlook Windows and Mac both. Also, one should have appropriate technical skills to handle the operation manually. So, if you are novice user, it is recommended to choose the method wisely.
Epilogue
In the write-up, we have provided different ways to transfer Outlook email from Mac to Windows. The first method is expertise recommended. Anyone can take help of this solution and perform the transfer process without encountering any modifications in the original database. It has exceptional features which are useful in attaining the desired outcome in less time. Besides, the solution is available with a freeware version with the help of users can transfer 25 OLM files free of cost. The second method is manual and free to use. Only technical can utilize it. The steps are complex and require knowledge of Microsoft Outlook. Therefore, one should opt for a wise method and perform the desired task. For any queries, contact Macflick Support.