How to Import OLM to PST File in Mac?
There are several Mac users who need to switch into Windows environment for official reasons. And most their work is done through emails. So, many times, they configure the same email application they were using on their previous platform such as Outlook because it has been programmed for Mac & Windows OS platforms. Both the versions deliver same working, still much find difficulty in accessing Mac OLM file in Windows Outlook. This is because they use different formats for data storage. On Mac, Outlook stores data files in OLM and on Windows, it exports the entire database into PST file.
As a result, there is no method available that could directly import OLM files into PST. Also if you are of those users who are not aware of any such approach that could fix how to import OLM to PST file in Mac, then not to worry at all. Because in the write-up, we have discussed a solution that will smoothly implement the process without altering the original data files.
However, in order to access Mac database into Windows, it is necessary to convert OLM to PST first because then only one will be able to import OLM files in Windows Outlook. Although, there is a manual procedure for the same but it should be done correctly otherwise it could lead to data loss. Therefore, it is suggested to make use of automated solution to perform the process without encountering alteration in email content, contact list, calendar events, journal entries, etc.
Manual Method to Import OLM to PST File in Mac
To implement the conversion manually, locate .olm files first. The files will be present in the following location –
- Documents\Microsoft User Data\Office 2011 Identities\Main Identity\Databases
- Documents\Microsoft User Data\MS Office 2011 Identities\Main Identity\Data-Records\Message
Instead, create it by saving mailbox database in OLM file. Follow the steps below –
- In the drive location highlighted above, navigate to File and tap Export. A new window will open.
- Choose the data appearing.
- A new option “Delete items after exporting” displays on the screen. Select “Do not want to delete item”.
- Now, Save As option will be displayed. Select Destination Location to restore OLM file.
- Tap Save button.
Once the OLM file is created, it can be converted to PST with the help of below steps –
Create IMAP Email Account –
IMAP works as an intermediate server between Mac Outlook and Windows Outlook. Gmail is the best platform for creating IMAP email account. After it is created, follow the steps mentioned below –
Step 1. Click Gear button displaying at the top right corner and navigate to Settings.
Step 2. Go to Settings Page; tap Forwarding and POP/IMAP appearing at the top.
Step 3. Check IMAP status, in case if it is disabled enable it and tap Save Changes.
Once the IMAP account is created, now configure Mac Outlook email account using the recently created IMAP email server profile.
Step 1. Run Outlook for Mac, navigate to Menu bar, click Tools and choose Accounts.
Step 2. Go to Accounts window, click Email and mention email account details.
Step 3. Specify email ID and password and click Add Account.
Step 4. IMAP account is successfully added.
Generate Gmail Label
Step 1. Login to Gmail account.
Step 2. Navigate to Settings, click Labels displaying at the top of the task bar.
Step 3. Click create new Label button.
Step 4. Enter name for new label on new label window and tap Create.
Ensure that IMAP checkbox is selected.
Step 5. Go to Mac Outlook and click Send/Receive button to update IMAP mailbox.
Transfer Emails from Outlook for Mac to IMAP
It is an essential part of the procedure as it transfers OLM data to IMAP mailbox.
Step 1. Run Outlook for Mac on the system.
Step 2. Right-click on the desired mailbox item, select Move and tap Copy to folder.
Step 3. Name IMAP folder to copy and then select Copy.
Step 4. Update Mac Outlook IMAP data by clicking Send/Receive button.
With the help of the above steps, all the emails and other data items start synchronizing with specified IMAP mailbox folder. Now, configure Windows Outlook using the same IMAP email account. Then, drag IMAP folders to Windows Outlook inbox folder.
Automated Approach to Import OLM to PST File in Mac
The stress-free method to import OLM to PST file in Mac is by using Macflick Mac OLM Converter Tool. With the help of the solution, users can batch import OLM files to PST at once. The application is user-friendly and designed with an intuitive interface which is manageable by anyone effortlessly. Additionally, the tool has many features that allow users to perform the necessary task according to the requirements.
Know Software Steps to Import OLM to PST in Mac
Step 1. Download and operate the Macflick software on Mac OS.
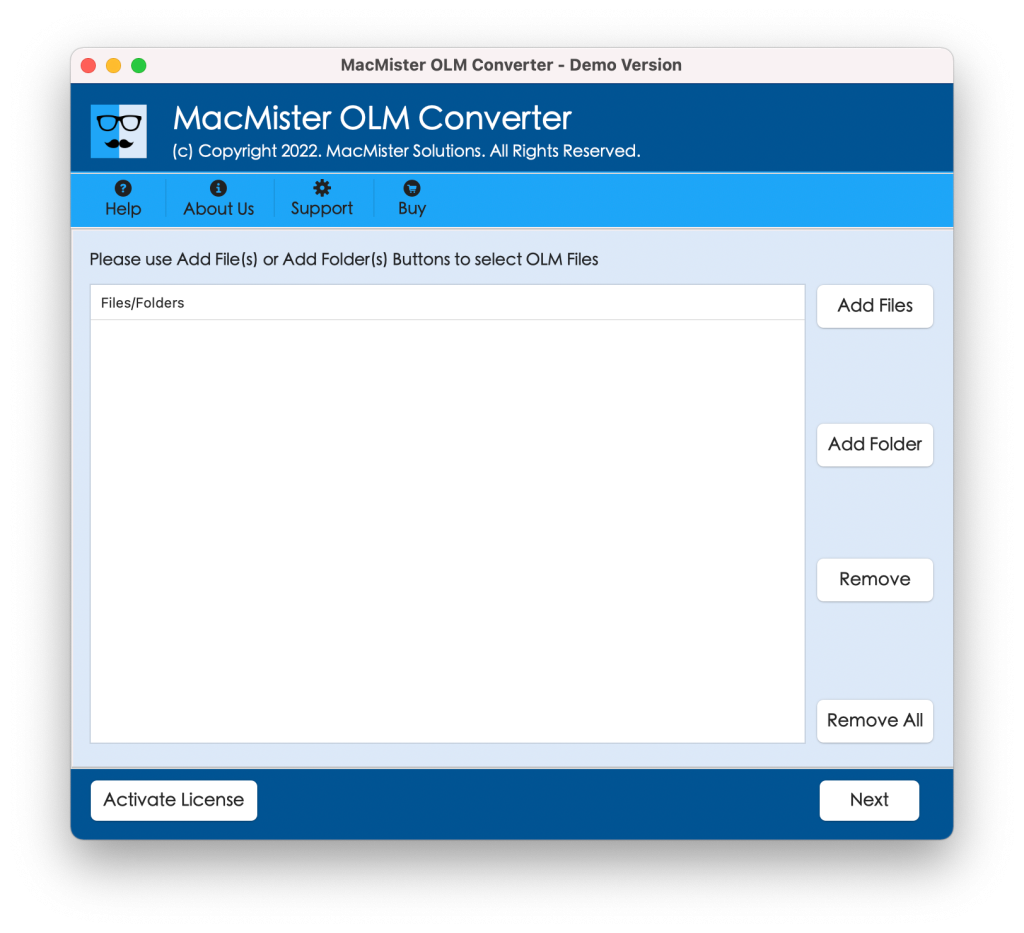
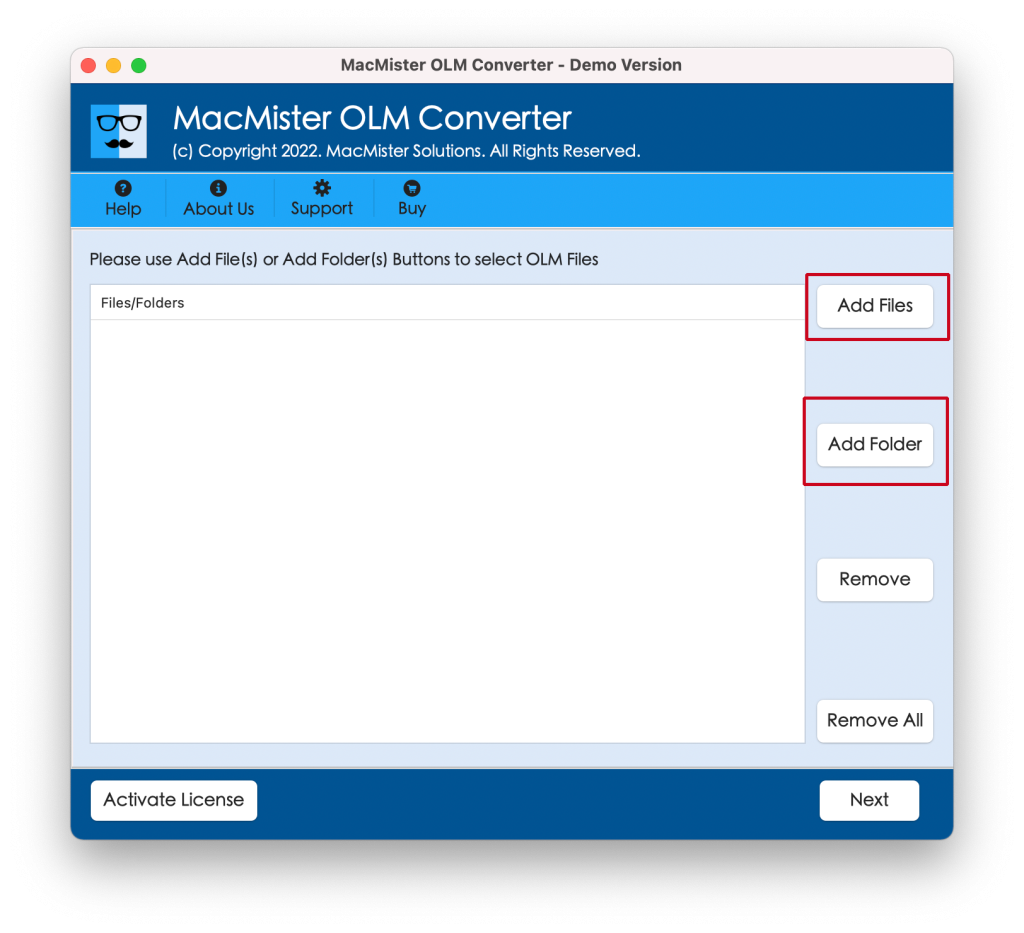
Step 2. Go to the right software window and use Add File(S)/Add Folder buttons to upload the essential .olm files on the software. Click Next.
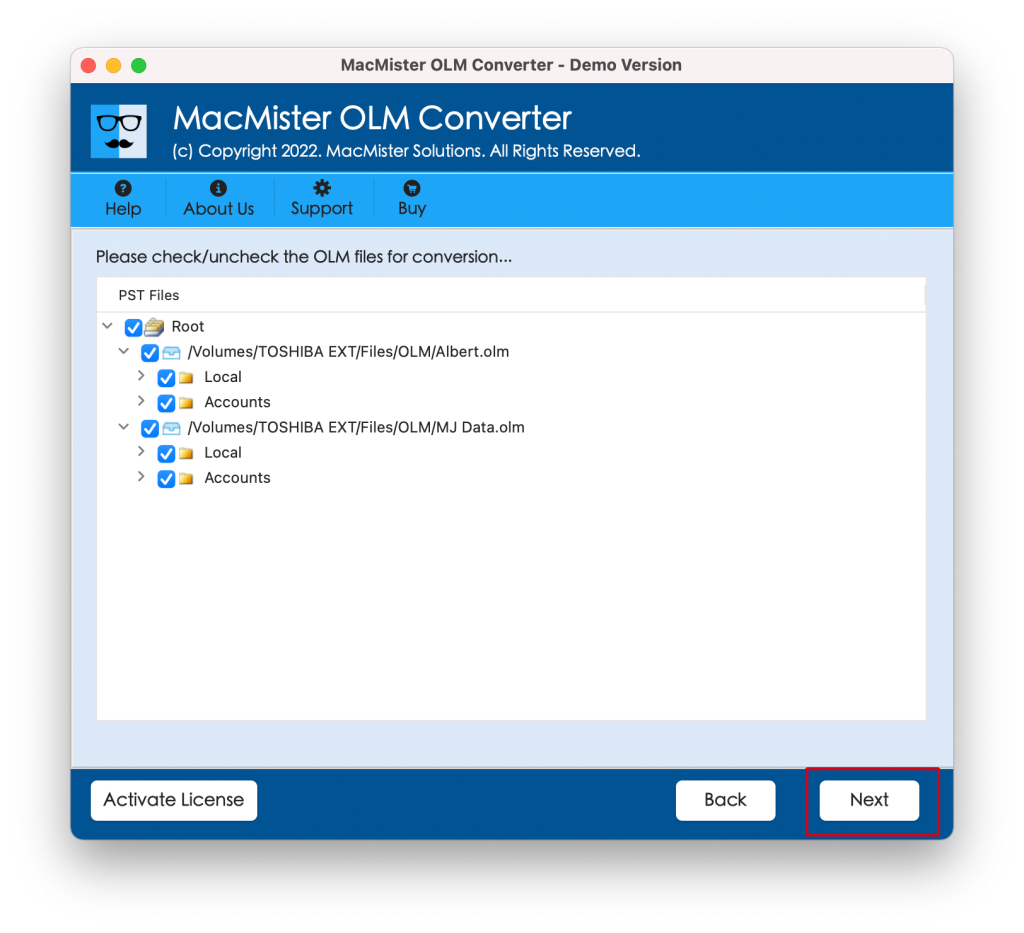
Step 3. Now, the tool quickly displays all the files on the panel. Each has a checkbox. Users can use checkboxes to import selected files, if required. Then, click the Next button to continue.
Step 4. Tap Select Saving Options, and select PST format from the drop-down arrow.
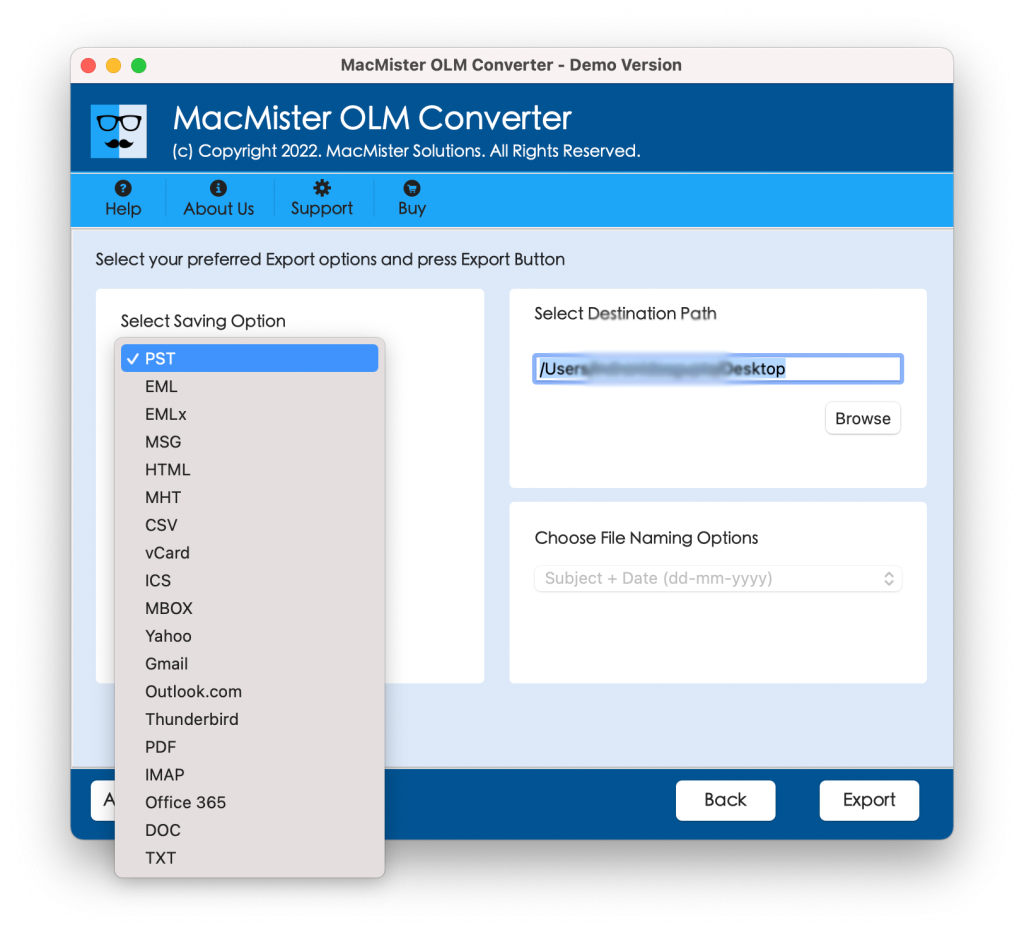
Step 5. Use PST sub-options as per the requirements and click Export button.
Step 6. The Live Conversion Report screen will appear that shows the live import progress of OLM files to users.
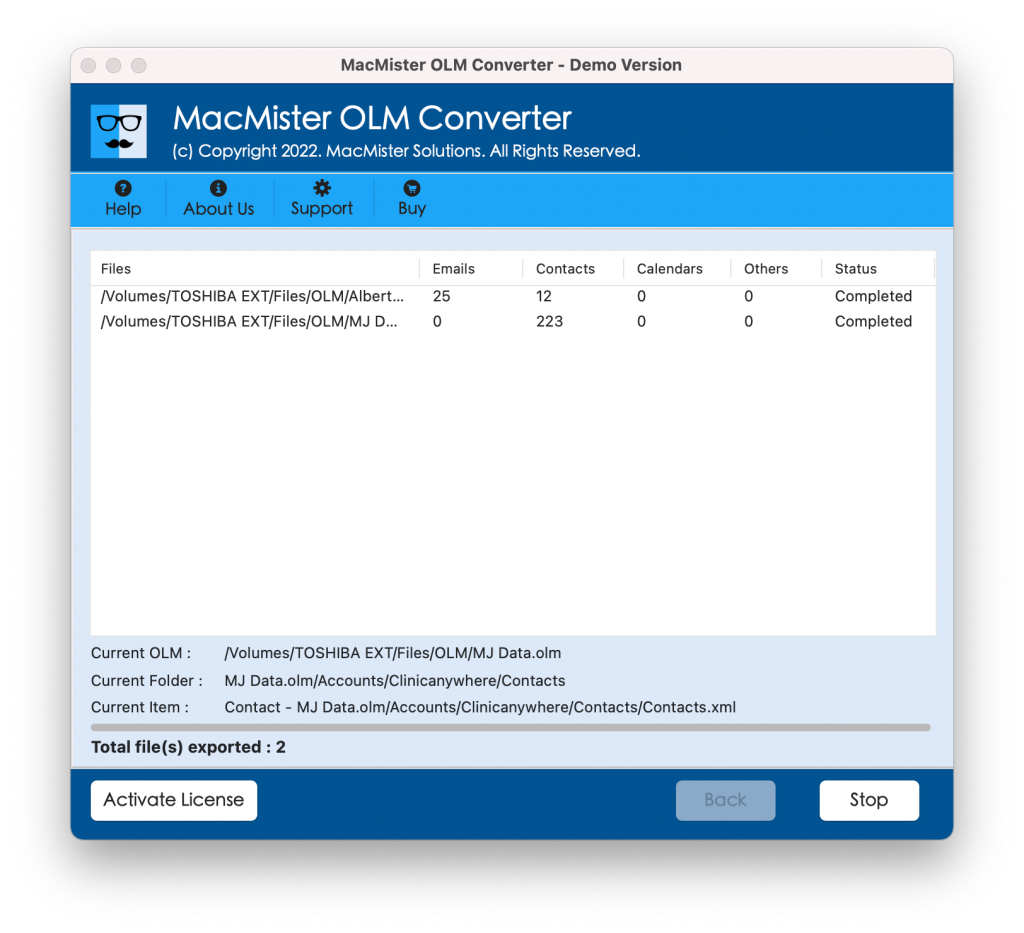
Within seconds, the import will finish and then “Conversion Completed” notification will display immediately on the screen. Click the OK button and then go to any cloud service or storage drive to transfer resultant files in Windows. Now, you may use Outlook Import/Export option to import .pst files in Windows Outlook.
Once the files are imported, then users can go to specified Outlook folder to check resultant files. However, you will see that the import process has been done correctly. Also, the original database will appear precisely once the process finishes.
Overall, it is a great technique to import OLM to PST in Mac.
Epilogue
The write-up here offered different ways to fix how to import OLM to PST file in Mac. There are different ways discussed to import OLM files. The first is manual which is free to use but possesses complex steps. The second method i.e. Macflick OLM to PST Converter for Mac is direct, cost-effective and safe. Moreover, it can be used by anyone easily. Even, one can download its trial edition to check the solution deeply. It allows to import first 25 OLM files to PST for free.